In a recent post, I listed 5 alternatives to a slide deck for communicating research findings. Of those, I believe a whiteboard animation is the one that can have the most impact, although I concede that creating a professional whiteboard animation (like the one we created to launch UX Mastery) may be overkill or out of reach for most projects.
In this post, I’ll explain how you can create a budget whiteboard animation, without all the expensive camera gear.
What is a whiteboard animation?
A whiteboard animation (also known as an explainer video, videoscribe, speed-draw video, or sketch video) is a format for communicating information by combining animated illustration with a voiceover. The combination of listening to an audio track while seeing the concepts come to life in time with the narration creates a powerful medium for communicating information, and is particularly well suited for content that is dry, or may be otherwise difficult to understand.
While a professional whiteboard animation requires a ton of planning and proper camera gear, is possible to create a budget whiteboard animation from the comfort of your desk, using a minimum of materials. The main outlay is a document camera.
Needless to say, this kind of animation can be useful in a number of situations, from marketing and communications to training and elsewhere. Here’s an example of the kind of video that I’m talking about:
What You’ll Need
To create a budget whiteboard animation like this, you’ll need the following (note: a whiteboard is conspicuously absent):
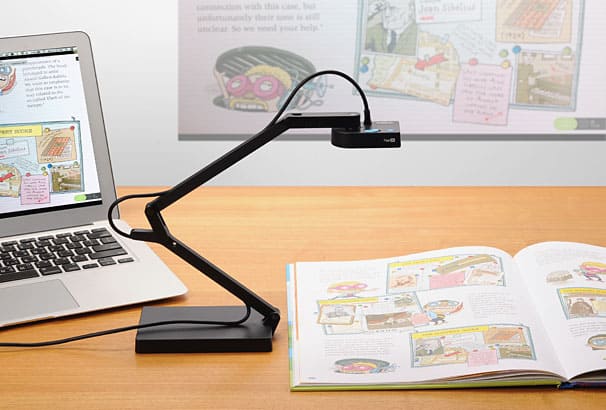
- Document camera. I’m a fan of the IPEVO Ziggi HD, which you can pick up online for around $100. It includes the IPEVO Presenter software, for displaying the camera image on your screen.
That’s it! You’re now ready to create your animation.
Process
Here’s the process I follow for creating my videos.
1. Write the script.
Every good whiteboard animation begins with a script. Your script defines the message you send, the length of the video, the pace of the imagery, and the overall success of your communication. No amount of clever illustration or video trickery can compensate for a poor script: you should be ruthless in cutting out fluff and articulating your message as succinctly as possible. Also keep in mind that your script is a story, and should be structured as such. Every good story follows a similar structure—a problem, some adversity to overcome, and a resolution. If your script doesn’t feel engaging, it’s probably because it doesn’t follow this structure.
2. Record the voiceover.
If your video is going to be seen by a lot of important stakeholders, you may consider having your audio track recorded by a professional voiceover talent, using a service such as Voice123 or VoiceBunny. Professional voice artists will process your audio track, remove breaths and background noise, and re-record sections that may be a mouthful or have multiple interpretations for intonation. Because many voiceover artists are employed to create radio ads and sales messages, they often have a difficult time removing that “sales” tone from their voice.
However, if you find the right talent, they will make your video sound much more professional than if you were to record it yourself. Of course, if professionalism is not a key factor in your presentation, then by all means, record it yourself. However, be sure to use a decent microphone, use a anti-pop noise protection filter, and record in a quiet room that minimises echos.
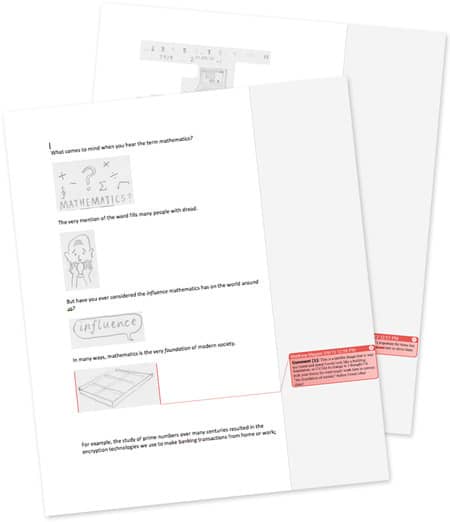
3. Create initial imagery.
Now that you know what you’re going to say, you can begin creating imagery for your script. This is the fun, creative bit—get sketching. Create two, three, or four sketches for each sentence. Some sentences may require multiple images—get them down. Don’t make them too elaborate though—remember that even when it’s sped up, it takes time to show your hand drawing each image, so there’s no point creating an intricate scene with elaborate detail for a six-word sentence. Don’t worry about the detail, just try and visualise each sentence using simple iconography and basic poses.
It’s also worth mentioning that your drawings don’t need to be accomplished works of art—we’re communicating ideas here, not recreating the ceiling of the Sistine Chapel. This format of video is compelling, regardless of whether the image you’re seeing appear is a stick man or a detailed illustration. In fact, there isn’t time for that level of detail. Keep it abstract, and aim for the representation of an object, not a photorealistic rendering. If you’ve played around with sketchnoting, you may have begun to build a visual vocabulary—draw upon those images here!
If some topics are difficult to visualise, see what Google Images throws up for those phrases. Keep in mind that while it would be ideal to accurately depict every sentence or key point as an image, sometimes that’s just not possible—in those difficult cases, it’s OK for your images to supplement and support the script rather than serve as a literal interpretation of it.
4. Arrange the imagery.
Once you’ve decided what imagery should appear for which parts of the script, it’s time to arrange your images. If you’re feeling confident, you may just want to redraw your images into one final illustration. However, it’s just as easy to scan everything and arrange them in Photoshop. This also gives you the flexibility to resize images, rotate them, stretch them, and basically massage them into the shape you want.
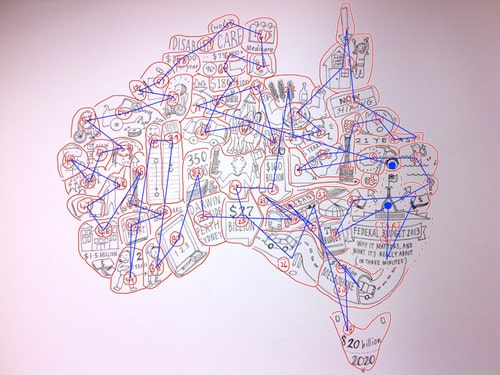
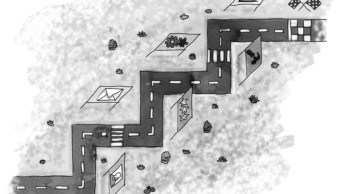
It’s at this point that you can consider creating your final illustration in a specific shape—for example, a map, or a logo. With this budget setup, it’s not really possible to create any kind of “zoom out” effect. However, it can still look impressive and introduce that extra element of delight that makes the user smile when they reach the end of your video.
5. Create guides.
With the script locked down and your imagery all planned, you can prepare for the big shoot. I recommend drawing some very light pencil guides on your paper. It’s important that these are dark enough that you can see them when drawing, but light enough that they are barely detectable by the camera.
I spend a good 10 minutes or so going over every guideline lightly with an eraser, so that it is faint but not too faint. While it is possible to increase the contrast on your video to fade them from sight, the last thing you want is ugly scratchy guidelines showing up in the final video.
6. Record the video.
Here’s the fun part—drawing your illustration on camera. It’s not as nerve-wracking as it sounds though, because you can take your time. We’ll be speeding the video up at the end, but that doesn’t mean you have to work quickly. Keep to your guides, and move at a pace that you’re comfortable with. If you get tired, take a break. And if you make a mistake, you can even use liquid paper to fix it. This isn’t live—you can edit things afterwards to bring it together.
7. Sync audio and video.
With your video shoot complete, you can finally make the magic happen by combining it with your audio track. Screenflow makes this task very easy, but it should be doable in any video editing software, lightweight or professional. The goal here is to:
- speed up segments of video so that they synchronise with the corresponding narrative of the audio, producing the “speed draw” effect
- pause the video at the end of sentences, to allow enough time for the imagery that has just been drawn to be digested by the viewer
- synchronise specific words that are narrated with footage of them being drawn on screen (if applicable).
- cut out parts of the video that are redundant—your hand moving into shot unnecessarily, or applying liquid paper if you make a mistake!
- apply filters so that the white paper looks very white, the black marker lines look very black and pencil guides are not visible
- perform any tidying up to ensure consistent lighting, remove frames when the camera may have been bumped or shaken, and adding any credits/logo at the end.
8. Add music.
A music track can sometimes give a video an extra lift, but is not always necessary. For music tracks, I usually end up choosing something from Audio Jungle or Video Blocks. These tracks are extremely affordable, and many include a license to use for commercial purposes.
9. Export and share.
Once that’s done, all that’s left is to export your file, and upload it to a video sharing site (if it’s for a public audience) or do a test play in a media player if you’re presenting from your own machine. Voila! You’re finished.
Whiteboard Animation Software
One last note: there is software out there (Sparkol Videoscribe and Moovly are examples) that lets you upload SVG imagery and automate the illustration effect by moving a photograph of a hand around the page. Personally I find these computer-generated animations don’t quite have the same appeal as one that uses actual footage of the illustration being created by a real person.
However, the ability to pull in stock imagery (the software performs an edge-trace, so you could even import photos) means that this approach could be an affordable solution if you don’t feel confident enough to create a video like this manually.
Get Creating!
I hope this inspires you to create your own whiteboard animations, for communicating findings to clients, creating marketing or training videos, or something else. Just about any story is made more compelling by adding visuals. Feel free to share your creations in the comments!
Really nice article! Another service that does something similar is http://www.sparkol.com – that might be handy for some people.
Keep up the great work!
Thanks Gerry. I did mention Sparkol at the end of the article already.
Cheers
Okay Matt, you have inspired me… might practice a bit before I go do it live…
Excellent. Look forward to the outcome, Gary! :)
Great help, Matt. I’m looking at doing this for teaching Maths to year 7 to 10. I agree the hand-drawn video is more appealing than the computer generated one. This way I can create exactly whatever I want. All I really need is the video editing software – I have everything else.
Thanks – great instructions.
Great work! I love how far the technology has come, that anyone regardless of their skill can produce a decent video with something like Sparkol or goAnimate.
Thanks for sharing
I am helping my mother create a video for her master’s thesis. This is super well done and very informative! I am impressed and grateful, thank you!
Great tutorial never seen a camera like that. Interesting and inspiring indeed. thanks!! I can put away my dry erase board and use nice art paper instead! :)
Thank you sir!
Many thanks, excellent material and suggestions. Great stuff. Cheers
Hi, do you think it is possible to use Logitech c920 as the camera?
Thanks a lot!
I never realized creating a whiteboard video was so simple! It’s a lot of planning, and it’s definitely time consuming, but at least it’s possible for a “normal” person like me :)
Nice article. And the ways of using whiteboard animations are limitless.
Here’s a nice article showing whiteboard animation business cases (incl. Coca-Cola, Carlsberg and Dropbox)
https://www.explainvisually.co/whiteboard-animation-best-business-cases/
Hey Ben – I’m the author of the article you’re linking to. I’m very happy to hear that you found it useful. Sometimes when I see people spending 2-3 minutes on the website I think nobody reads it :)
Hi Maciej – thanks for coming over to say hi. Love your work. :)
Very informative and helpful! Definitely gonna share this article with my friend who was looking for help with creation of a whiteboard animation. Also, your writing style is very clear!
Thanks for all the hard work!
Thanks Matthew for such an informative article about whiteboard animation I always found voice over part little harder but all other parts of whiteboard animation is easy and fun.
This information is so useful for creating a budget whiteboard animation.
Thanks Matthew!!! You have provided a detailed explanation on video creation. Video marketing is booming and it’s right time for Webmasters and Digital Marketing people to invest time on Video marketing.
The article is amazing thanks! :D I would add that you can use an iphone or android phone with a tripod, either specialized for overhead recordings like Arkon Pro Phone Stand or fix your phone on a cardboard box with holes, a pile of books, a desk lamp, a selfie stick of dollar store inserted into a bottle filled with sand or any heavy material to keep it steady or hack many components you can find on Ikea or dollar store to create a bridge to stick to phone on. Keep the mindset of “hacking” things, be inventive and creative and start as cheap as you can and go up if you need to. There are even reusable adhesives, tape replacement, like instant TAC, that you can get on dollar store, to stick your phone case to many places. Of course be careful with that to not break your phone.
I’ve admired whiteboard animation for years. But until just now never thought I had the skill or money to do it.
Thank you for this awesome post!
Much obliged Matthew for such an instructive article about whiteboard activity. I personally found the voiceover part harder, but overall the different pieces of creating a whiteboard animation are simple and fun.
Very helpful, thank you very much!!
Is it really possible to draw the whole animation in one single A4? I was thinking about it and it didn’t seem possible😭
This information is so useful for creating a budget whiteboard animation.